-Frustum culling-
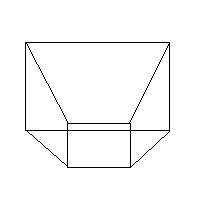
There is one golden rule when drawing objects on screen. DONT DRAW WHAT CANNOT BE SEEN. The first step toward that is frustum culling. As you probably know, for a perspective projection (I'm ony gonna draw the figures for that here), the view region looks somewhat like...
If this looks like a pyramid with the top chopped off to you, then you are getting the right idea. Otherwise, look harder ;). The parameters that you specify for FOV, near clipping plane, far clipping plane, etc make up the size and shape of the frustum. To find if a point is inside this frustum, we have to first get all the parameters that we need to describe the frustum. No, I'm not talking about the FOV and stuff, but rather the plane equations of the six sides.
If you remember the plane equation from your high school co ordinate geometry ;),
Nx*x + Ny*y + Nz*z + D = 0
where Nx,Ny and Nz are the 3 components of the normal to the plane. The x, y and z in the quation are the co ordinates of any point on the plane. The variable D is the distance of the plane from the origin. A point that is being tested can give three results based on where it is with respect to the plane.
1. The point is in front of the plane - In this case, the result obtained will be positive. The value obtained is the distance of the point from the plane being tested.
2. The point is behind the plane - In this case, the result will be negative. The value obtained is the distance of the point from the plane being tested.
3. The point is on the plane - The result will, quite obviously, be zero.
So, if a point we are testing is in front all of the planes, it is obviously inside the frustum. If it falls out of even one, however, it can be discarded. Let is now look at the TFrustum class interface.
type
    TFrustumValues=array [0..5,0..3] of TFloat;

    TFrustum=class
                  private
                  proj,
                  modl,
                  clip:array [0..15] of TFloat;
                  fFrustum:TFrustumValues;
                  protected
                  public
                  //Call this for each frame....or when the camera is moved
                  procedure CalculateFrustum;

                  //Can checking get any simpler than this?
                  function PointInFrustum(aX,aY,aZ:TFloat):boolean;
                  function SphereInFrustum(aX,aY,aZ,aRadius:TFloat):boolean;
                  function CubeInFrustum(aX,aY,aZ,aSize:TFloat):boolean;
    end;
Lets now take a walk through the code for CalculateFrustum since it does the main job of getting the plane data. The rest looks kinda easy now, doesnt it?
     glGetFloatv(GL_PROJECTION_MATRIX,@proj[0]);

     glGetFloatv(GL_MODELVIEW_MATRIX,@modl[0]);
Ask OpenGL to fetch the projection matrix and the modelview matrix for us. Since we are doing the fetching after OpenGL has set the view/projection matrix, we can use any camera or projection. It simply doesnt matter. Of course, you must remember to call CalculateFrustum only AFTER setting the projection and view matrix. The matrices are simply 16 element arrays of TFloat, which is a glFloat.
     //Multiply the two matrices, modelview and projection to get the clip matrix
     clip[ 0] := modl[ 0] * proj[ 0] + modl[ 1] * proj[ 4] + modl[ 2] * proj[ 8] + modl[ 3] * proj[12];
     clip[ 1] := modl[ 0] * proj[ 1] + modl[ 1] * proj[ 5] + modl[ 2] * proj[ 9] + modl[ 3] * proj[13];
     clip[ 2] := modl[ 0] * proj[ 2] + modl[ 1] * proj[ 6] + modl[ 2] * proj[10] + modl[ 3] * proj[14];
     clip[ 3] := modl[ 0] * proj[ 3] + modl[ 1] * proj[ 7] + modl[ 2] * proj[11] + modl[ 3] * proj[15];

     clip[ 4] := modl[ 4] * proj[ 0] + modl[ 5] * proj[ 4] + modl[ 6] * proj[ 8] + modl[ 7] * proj[12];
     clip[ 5] := modl[ 4] * proj[ 1] + modl[ 5] * proj[ 5] + modl[ 6] * proj[ 9] + modl[ 7] * proj[13];
     clip[ 6] := modl[ 4] * proj[ 2] + modl[ 5] * proj[ 6] + modl[ 6] * proj[10] + modl[ 7] * proj[14];
     clip[ 7] := modl[ 4] * proj[ 3] + modl[ 5] * proj[ 7] + modl[ 6] * proj[11] + modl[ 7] * proj[15];

     clip[ 8] := modl[ 8] * proj[ 0] + modl[ 9] * proj[ 4] + modl[10] * proj[ 8] + modl[11] * proj[12];
     clip[ 9] := modl[ 8] * proj[ 1] + modl[ 9] * proj[ 5] + modl[10] * proj[ 9] + modl[11] * proj[13];
     clip[10] := modl[ 8] * proj[ 2] + modl[ 9] * proj[ 6] + modl[10] * proj[10] + modl[11] * proj[14];
     clip[11] := modl[ 8] * proj[ 3] + modl[ 9] * proj[ 7] + modl[10] * proj[11] + modl[11] * proj[15];

     clip[12] := modl[12] * proj[ 0] + modl[13] * proj[ 4] + modl[14] * proj[ 8] + modl[15] * proj[12];
     clip[13] := modl[12] * proj[ 1] + modl[13] * proj[ 5] + modl[14] * proj[ 9] + modl[15] * proj[13];
     clip[14] := modl[12] * proj[ 2] + modl[13] * proj[ 6] + modl[14] * proj[10] + modl[15] * proj[14];
     clip[15] := modl[12] * proj[ 3] + modl[13] * proj[ 7] + modl[14] * proj[11] + modl[15] * proj[15];
I'm doing this the painful way because OpenGL preserves the matrices in column major order, and instead of a transpose and multiply........well this IS faster. Although infinitely more painful :)
     //Get the right clipping plane
     fFrustum[frustum_RIGHT][plane_A] := clip[ 3] - clip[ 0];
     fFrustum[frustum_RIGHT][plane_B] := clip[ 7] - clip[ 4];
     fFrustum[frustum_RIGHT][plane_C] := clip[11] - clip[ 8];
     fFrustum[frustum_RIGHT][plane_D] := clip[15] - clip[12];
     //...and normalize it
     NormalizePlane(fFrustum, frustum_RIGHT);
Here, we get the right clipping plane. I'm not gonna replicate the code for the other five planes here. Its really almost the same. Now we have the plane data in our possession.
Since our planes face inward, the point(s) we test will have to be in front of all the planes to pass the PointInsideFrustum test.
The example with this tutorial uses a RUVCamera to look around. The scene is practically littered with lit, colored spheres. The "C" key toggles frustum culling. The "0" and "1" numeral keys change the objects into spheres and cubes. The cubes render pretty smoothly even without culling because of the lower polygon count but remember, the sphere test is less expensive than the box test.

>>Download the tutorial source
You'll also need, in case you dont have them already
>>Download the OpenGL 1.2 headers
>>Download the GLUT headers