-Writing a Camera class- |
Here
is the tut on the camera class. I will, ver the course of this tut, present
a camera class that can be used (and extended) quite easily. It can also
be adapted quite easily for first person viewing, although I will only be
using it as a 3rd person cam. First, let us cover a little ground on camera
transformations. I presume most of you reading this tut have used gluLookAt.
If not, I suggest you use that for a bit, to get the hang of viewing without
the matrix math involved. Ihave always found it better to think of the scene
in terms of world axes, and leaving the viewing to a separate mechanism,
which in this case would be a camera class. That way, you never end up thinking
in the "opposite" way (world-to-view, not view-to-everything-else). For those of you who *have* used gluLookAt, it is analogous to a target camera in MAX. I mean, you tell where it is supposed to be, which co ordinates to look at, and you're all set. gluLookAt, by the way accomplishes this using a set of glRotatef's and glTranslatef's. I have found it better to construct the entire matrix on my own, and glMatrixMult it at one go. |
The camera we construct will be a "free camera" in the MAX sense. I mean, we can tell it where to position itself, and which direction it has to orient itself. You cant target it to a co-ordinate or anything (not the base class). |
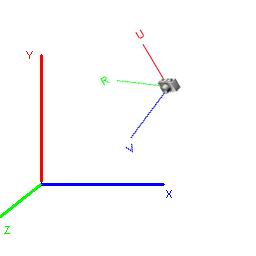
I will now briefly cover the camera model we are going to use. The working model that I implemented for my engine was from a splendid tutorial by Tom Nuydens of Delphi3D. It's called the RUV model (thats what I call it, anyway). If we were to use a translation, and X,Y,Z rotation to represent the camera, we would suffer from the problem of gimbal lock (it is really exasperating to code a lot and then discover you were wrong to start with). I am not going to go into what gimbal lock is, or anything. You can find a lot of atricles on it. This camera overcomes this drawback, and that should be good enough. |
First let me explain what the 3 axes R,U and V mean. Perhaps a diagram can do it better than words. |
R, could quite simply be Right (of the camera that is.) U is, you guessed it Up. V (no points for guessing this one) is View. So these, along with the origin of this axis system constitutes an entire description of camera orientation. This, actually is the famous axis-angle system. This is not a math paper, so I wont go into the specifics. Since all rotations happen relative to the axes, there will be no gimbal lock. The base TRUVCamera class (that's what we're going to call it), will implement only the basics. A property to set the current translation of the camera axis system (or the camera if you prefer it) relative to the world origin, and a set of three methods that rotate the camera about its R, U and V axes respectively. |
Here is a snippet of code that shows the declaration of the camera class. Actually, it is better to declare a base camera class, that implements basic stuff that any camera would require. You got it, that would be a viewing volume. So whats shown below is the interface of the base TCamera class. We will derive other cameras from this, so TRUVCamera will be be a descendant of TCamera. |
//Base camera class to derive custom cameras from TCamera=class private fName:shortstring; fViewVolume:TViewVolume; public constructor Create; procedure SetView;virtual; property Name:shortstring read fName write fName; property ViewVolume:TViewVolume read fViewVolume write fViewVolume; end; |
The virtual method SetView sets the viewing volume using the instance of TViewVolume declared. All descendants, then, have to call inherited SetView before tending to their business. The implementation is trivial, and I'm not going to go into it here. |
So then, we finally arrive at the declaration of the TRUVCamera class. OH! Another thing. Starting from now, we will be using two units, one with basic types, called (for want of imagination) Basetypes.pas and the other with basic math routines BaseMath.pas respectively. There are a lot of types and functions in the two, but i'll explain only what is used in the tuts. That should keep things simpler (for me!:) |
TRUVCamera=class(TCamera) private fViewpoint:TVector; fR:TVector; fU:TVector; fV:TVector; protected public constructor Create; property R:TVector read fR write fR; property U:TVector read fU write fU; property V:TVector read fV write fV; public procedure RotateAboutR(amt:TFloat); procedure RotateAboutU(amt:TFloat); procedure RotateAboutV(amt:TFloat); function GetView:TMatrix;virtual; procedure SetView;override; property Viewpoint:TVector read fViewpoint write fViewpoint; end; |
The position of the camera, is represented by a simple translation, and hence a TVector. You can see, that the TRUVCamera.SetView overrides the TCamera class's SetView method. The only things that merit description here, are the three methods RotateAboutR, RotateAboutU and RotateAbouV.(There are other methods in the actual declaration, but they quite simple, and do not merit a discussion here. Only the most important methods/properties are listed.) |
We'll see what these three do, before we take a look into the innards of the SetView method. |
procedure TRUVCamera.RotateAboutR(amt:TFloat); begin fR:=VectorRotateX(fR,amt); fU:=VectorRotateX(fU,amt); fV:=VectorRotateX(fV,amt); fR:=VectorNormalize(fR); fU:=VectorNormalize(fU); fV:=VectorNormalize(fV); end; |
All this function (the other two are written in a similar vein) does is to rotate the three vectors by the requested angle. I also found wierd things happening if I dont normalize the three vectors. If someone finds a way to do this faster, please let me know. |
Here is what the functions VectorRotateX and VectorNormalize do |
function VectorRotateX(v:TVector;a:TFloat):TVector; var temp: TVector; sine,cosine:TFloat; begin a:=a*DEGTORAD; sine:=Sin(a); cosine:=Cos(a); temp[X] := v[x]; temp[Y]:= (v[Y] * cosine) + (v[Z] * -sine); temp[Z] := (v[Y] * sine) + (v[Z] * cosine); result := temp; end;function VectorNormalize(v:TVector):TVector; var val:TFloat; begin val:=v[x]*v[x]+ v[y]*v[y]+ v[z]*v[z]; val:=sqrt(val); result[x]:=v[x]/val; result[y]:=v[y]/val; result[z]:=v[z]/val; end; |
So, after all this, lets go into the SetView method, which is the heartbeat of our camera. |
function TRUVCamera.GetView:TMatrix; var rotMatrix,transMatrix:TMatrix; begin transMatrix:=GetIdentity; transMatrix[0,3]:=fViewpoint[0]; transMatrix[1,3]:=fViewpoint[1]; transMatrix[2,3]:=fViewpoint[2]; rotMatrix:=GetIdentity; rotMatrix[0,0]:=fR[0]; rotMatrix[1,0]:=fR[1]; rotMatrix[2,0]:=fR[2]; rotMatrix[0,1]:=fU[0]; rotMatrix[1,1]:=fU[1]; rotMatrix[2,1]:=fU[2]; rotMatrix[0,2]:=fV[0]; rotMatrix[1,2]:=fV[1]; rotMatrix[2,2]:=fV[2]; result:=MatrixMultiply(transMatrix,rotMatrix); end; procedure TRUVCamera.SetView; var view:TMatrix; begin inherited; view:=GetView; view:=MatrixTranspose(view); glMatrixMode(GL_MODELVIEW); glLoadIdentity; glMultMatrixf(@view[0,0]); end; |
SetView internally calls the function GetView, which returns a matrix. GetView constructs the view matrix in three steps. |
|
SetView converts the row major matrix into column major order, and performs a glMultMatrix with the identity matrix to achieve the required view. Simple, huh?!! |
We revisit the textured box of the Texture tutorial in the camera class. You might have noticed that in the texture tutorial, sometimes the box moves in an unnatural manner. That is, rotates up when the mouse is moving down, etc. Try rotating the box in this tutorial. You'll find that, no matter how you rotate the box, the sense of direction is maintained. This is because we have gotten rid of gimbal lock (YIPPPEEEE!). Since the example is really similar to the previous one, I'm not going into it here. Besides, the code is heavily commented. Next tutorial, billboards. |
>>Download the tutorial
source You'll also need, in case you dont have them already >>Download the OpenGL 1.2 headers |